Planning
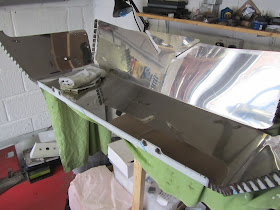
Time to have a go at fitting the rear panel, first off I thought I would work on the ground, the back/floor bend is already put in at the factory.
Looked at it for a while, changed my mind about the floor, tidied the bench, and moved everything to working height. I marked a centre line on the top & bottom edge of the panel, and centre of the shroud panel which should help lining things up a little later on.
First try: Guides and thumbs
Ultimately decided the first part to bend should be the tabs on the bottom edge, this is out of sight once built and I thought it would be a good area to practice on. My first attempt was to clamp scrap wood either side of the fold line and push the tabs up with my thumbs. The result was a straight line, but not a very tight corner.
Advice & Better technique: Mole grips
I gave Richard @ GBS a call and asked for some advice, a few points I really wanted to clarify:
- Should I bend the top edge tabs before or after curving the panel? -> tabs first, bend afterwards
- How to bend the rear panel -> push into the corner of the bend while folding
- How to get tight bends -> mole grips!
I tried out mole grips on the other bottom edge, there wasn't room for a straightedge, but the mole grips give a much tighter bend. I used a couple of strips of steel on the wider tabs to effectively widen the jaws of my grips. I checked an offcut of trim against my folds to double check I was getting a good enough result, i.e. to ensure the folds are tight enough to be hidden by the trim when I come to do the top edge.
The technique appears to be pressure towards the bend point at the same time as making the bend.
Not a bad job, just care on each tab to get the nose of the grips a little back from the fold point. The burned plastic is residue from laser cut when the panel is manufactured - it will be peeled off once everything is installed.
Bending the ends
Next up is bending the ends inwards to form side panels. I have the GT/Wide chassis so these only go as far as the high point on the wheel arches. I tried a technique I have seen on other builds, using the rear shroud panel inside the rear panel as a former for the curve. It wasn't working for me so I removed it.
Slowly bending each side up, I found a rolled up old towel useful for putting pressure inside the corner as I was bending, it seemed to help avoid creasing the metal due to too much localised pressure. The floor panel (vertical at the back in this picture) also needed bending inwards a little more - there is a locating hole on the top tab, and the sides to line everything up.
Note - The bottom two holes on the sides are to mount the diffuser, the small hole in the last tab of the floor lines up with the single smaller hole on the side panel.
I think the next step is to offer it up to the rear of the car - which I suspect will be easier if I raise the chassis on axle stands and take of the rear wheels. I'm also going to check some other blogs re position of rivets.
I have never done anything like this before so pretty happy at how it came out!
I have never done anything like this before so pretty happy at how it came out!


