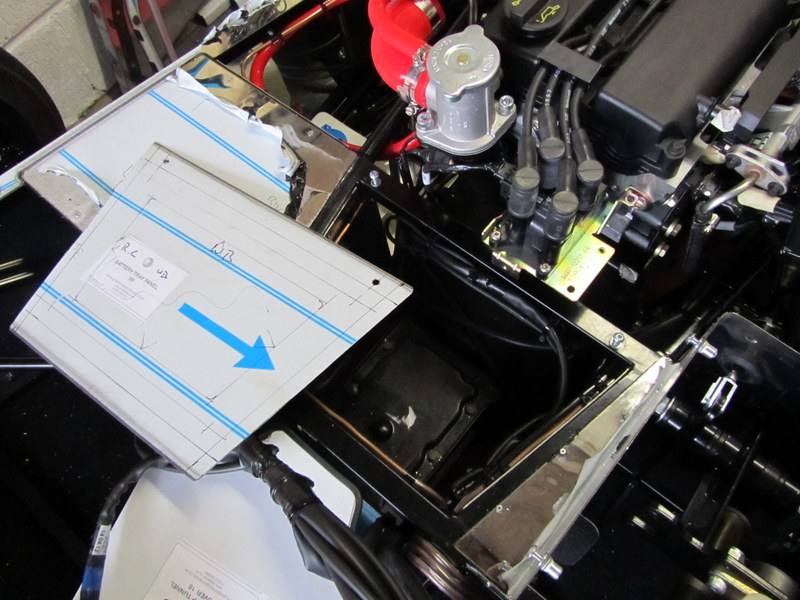
Tuesday, 13 November 2012

Scuttle - #2

I take it all back, the scuttle panel is as much 'fun' as the rear panel :)

I did only spend about 20-30 minutes on it this evening. The panel is not quite long enough to reach around each side without the help of a ratchet strap (padded) & while the ends are in place along the side panels its slightly deforming the firewall panel so will need some fettling:

I have the clecos in the front edge, It will need dismantling and the tabs adjusting before anything is fixed permanently:

It can sit like that for a couple of days, then I think I'll drill out a line of rivets along the rear edge to fit the inside panel. I also want to offer up the bonnet before bonding and fixing the geometry of everything:

Need some more M6 20mm washers!

Sunday, 11 November 2012

Scuttle - #1

Time to fit the scuttle; 


First the firewall needs its final fit and rivnuts in place. I used low profile rivnuts; the ones on the chassis cross tube sit right at the front edge with the firewall panel lined up on its rear edge. This is all then bolted up tight along with the pedal box cover to give a datum for the scuttle panel:

It will all come off again before I'm done, for some foam draft strip to seal the removable parts & some washers under the bolts.


Scuttle panel

The scuttle panel is much easier to deal with than the rear panel, I used the same technique - rolled up towel to push into the corner, without kinking, as I rolled up the ends:

Just sat on top initially, I bolted down the offside to check the fit, but that leaves the nearside end high and dry - working from one end is not the way to go. This did let me identify where the panel needed some fitting though - a couple of notches/squares cut out of the leading edge:

Then working from the centre tab to either side drilling and holding with clecos, this should pull either side round to sit on the side tubes:

Saturday, 10 November 2012

Battery tray panel & Firewall

Battery tray panel

I want to keep my options open re routing of heater pipes & access to the  loom which runs under the centre of the battery tray and above the gearbox. I thought about an access hatch in the panel (see pen lines) but ultimately decided the best approach was to cut the panel in half along the line of the chassis tube underneath.

I double checked the battery position with firewall and bonnet in place and the GT chassis seems to have enough width for the battery to sit completely over the passenger footwell.

Permanently riveted & bonded the passenger footwell section in place, with a couple of rivnuts on the leading edge of the centre section to bolt it down:


Firewall Prep

The idea is to have the firewall/scuttle easily removable while at the same time keeping the pedal box cover & passenger footwell cover permanent & sealed from the elements.

I modified the firewall: On the drivers side the tabs which originally sat on the chassis tube are bent vertically down to sit behind it meaning the whole thing can easily slide upwards when unbolted:

From the centre to passenger side the firewall sits on top of both panels, to be bolted in place only; thus

Firewall with scuttle should unbolt and be removed straight up, and the centre section of battery tray panel should slide out from under the firewall -or- if the scuttle/firewall section is removed can be lifted straight up:


All set for fitting. I think this is a good compromise, slightly more complex battery tray & firewall area, but gives me 100% access.

HP fuel return line re-route

When re-working the loom under the plenum I re-thought the fuel line routes & I think this is an improved layout for the return from the fuel pressure regulator to the swirl pot.

This time it goes along the outside diagonal chassis rail, I think this keeps things tidier and clear of the steering column:

The diagonal round chassis rail under the plenum takes the wiring & clutch cable.
The diagonal chassis rail on the side panel takes the fuel return & accelerator cable.


Wednesday, 7 November 2012

Offside front suspension & brake calliper

Ditto nearside except:

1. I found the return springs for the brake callipers - so I need to re-visit the nearside to fit one
2. I tightened the copper brake line, then tried to adust the brake line route a little and snapped the flared head off - clumsy & silly!

I need to seek out a pipe flaring kit to re-finish the end of the brake line.


Sunday, 4 November 2012

Rear loom & Pedal Box Cover fit

Rear Loom

More time than I expected to finish off the cable routing under the boot space; including wiring up the fuel pump - which would have been much easier before the boot panel was in place. All set now - I'm leaving the boot floor open until I have adjusted the handbrake:

Pedal Box Cover

Rivnuts to hold the lid on - notable here is no rivnut on the front offsite to allow clearance for the accelerator cable (of course I only realised that after drilling the holes, but luckily just before I installed the rivnut :).  An extra rivnut on the front edge to make this rock solid since the accelerator cable outer pulls against this during operation. Not forgetting 4x holes on the back tabs ready to attach to the firewall panel.

I had already fitted and done most of the adjustment on the cover, and this time it only needed a little taken off the outside edge to sit snugly against the side panel. The rivet holes and final fit was all marked up and drilled with the cover's lid in place too.

Bonded and riveted in place:

Making doubly/trebly sure the accelerator pivot bolt holes are in line:


Saturday, 3 November 2012

Side Panel - offside on

My next milestone, both side panels are now in place;

Moved the car over to the other side of the garage this weekend, faffed around trying to work out IACV wiring, tidied up some of the wiring in the boot area and then moved on to the side panels:

First up - showing my rivet positions, the fit & clecos:

Then bonded into place down all the side chassis rails and rived. I'll leave it to go off a little overnight before completing the rear quarter panel and re-installing the suspension. The steering rack hole lines up a little better on this side:

Wednesday, 31 October 2012

Seat runners - trial fit

My seat runners arrived in the post; 
I thought they would need adjusting but I lucked out - perfect length, 330mm, and the adjuster bar just needed a little gentle bending to change from 290mm width as sold, to the 300mm width of the seats:

These were from Ebay/KDR Seating, now I have them in my hands they look identical to the CBS ones:


Of course - I don't have the right bolts to fit it to the car - I need some M8 40mm (possibly 30mm?) Cap head screws...

Tuesday, 30 October 2012

Nearside front suspension & brake calliper

I need to get the car back on its wheels so I can shift everything over to the other side of the garage and fit the offside panels;

The front suspension goes back on & torqued up for (hopefully) the final time, I've installed most of the IVA covers, around the panel openings & especially those on the track rods so I don't have to dismantle everything again. The brake line is twisted to ensure it doesn't touch anything as the steering moves from lock to lock:

Calliper installed, bleed nipple uppermost, bolted with lock washers and threadlock & connected up to the copper brake lines inside the car:


Nearside is all set! Shes back on her wheels & looking much more like a car now:
(I still have to sort out the tracking - that can wait until much later)

Sunday, 28 October 2012

Side Panel - nearside on

This should have been plain sailing - I ran into an unexpected issue - the masking tape I had put on the chassis tubes for marking out some weeks ago had permanently attached itself and proved difficult to remove. White spirit easily desolves the glue however the masking tape is waterproof so needed scraping off first before the white spirit could clean up.

The planned rivets worked well for holding everything in place:

This row on the underside just needed the ratchet strap to hold things in place long enough to rivet, then the rivets hold the side in tight for the bond to go off. Its not very clear from this picture - but I put a line of 5 rivets on the left hand edge of the floor which holds the outside (right) edge tight against the glued chassis tube:

A little heath robinson to hold the panel against the chassis tubes, and the rear quarter installed over the top; taking care to only place rivets where they will be hidden by the wheel arch later:

Next step is to put the front suspension back on & install the front brakes, then I can move the car over to the other side of the garage and repeat the exercise on the offside.