Saturday, 9 February 2013

Rye

Not much to show today; I spent the day getting out of the house towards Rye, Kent.

Saw some sort of Seven kit: green/ali in the town & a blue Caterham on the way home. The roads around Rye, Romney & Dungeness power station will be a fantastic location for a run out in the Zero; lots of quiet, flat, relatively wide, good visibility roads & the odd remote pub dotted here & there.

Some good challenges too with unexpected right angle corners with 5' drops into ditches either side of the road.


View Larger Map

I have my eye on the marshes on the north side of Kent too - these roads are begging for a time trial, you'd just need a local landowner into cars that could close the roads :)

View Larger Map

Cycle wings

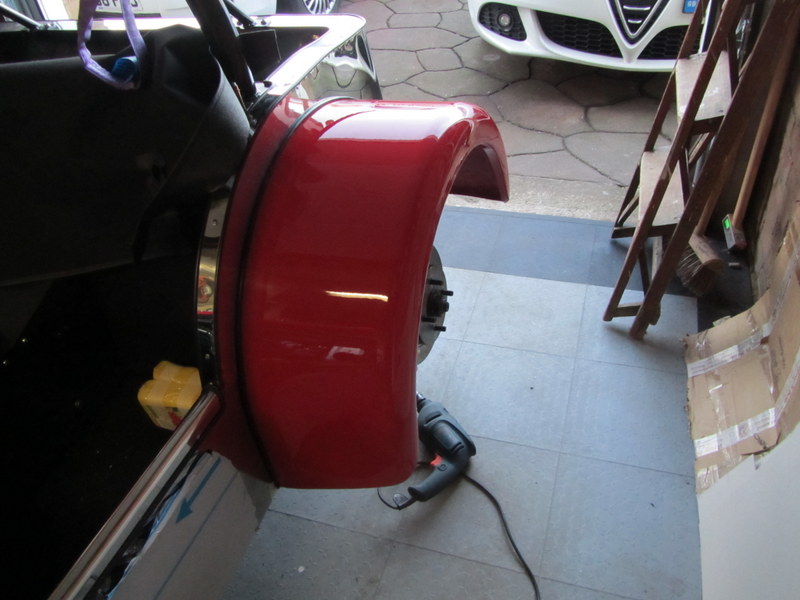
I did make a start on the front cycle wings, just adding the edge trim & offering them up on the car. Dug out the relevant part of the IVA manual on wheel arches & all set to fix them.


They don't line up that well when just sat on the stays; as pictured here the arch is sitting too far forward. I need to get the car in the drive and look at the profile from a distance before deciding on their final position and mounting them:


Rear lights

My 'full kit' didn't have fixing bolts for the rear lights so also got these in ready to install too.

Early in the build it was challenging to find a simple hardware/nuts bolts supplier. I've ended up using Spalding Fasteners who generally turn round orders and deliver within a couple of days, or for thre 'must have today' more basic stuff Screwfix actually have a good selection & are 5 minutes down the road, provided you don't mind ordering things in 100s!

Thursday, 7 February 2013

Oil breather

Standard build is to remove the crankcase oil breather and replace with a nice GBS cover; I did start a question on oil breather options on RhoCar early in the build - its a hot subject and no clear answer. There is some good discussion out there & a good article here from Burton Power with background information on the breather setup.

My final decision was to leave the crankcase OEM oil separator tank in place along with its outlet pipe which runs along the back of the engine under the coil pack. 

My thinking is: If its ok to run the engine with no crankcase vent, then the OEM separator an breather cant do any harm, and may do some good letting the crankcase breathe.

The breather itself has a vacuum adjusted valve (PCV) which will not function since there is no vacuum connection - however this valve is a: always open at least partly b: will be pushed open before pressure in the crank case would push past the oil to the top of the engine or past the cylinders - so again  - I don't see any harm in leaving this in place. My personal decision & thought process only. (see update at the bottom)

With this in mind I adjusted the old breather pipe which used to run to the OEM intake manifold, with the addition of a nylon 10mm 'T' the same pipe can be used to join the rocker cover breather with the crankcase/oil separator outlet and an air filter thus:

You can see the metal pipe from the crank case breather/oil separator at the bottom of this picture:

All set with the air filter in place - it needed a little self amalgamating tape around the hose to be large enough for the air filter to clamp on completely:

I think thats a reasonably neat solution; the only extra part was the 10mm 'T'

Update - eventually opened up the PCV

Swirl pot out

The swirl pot is on its way back to GBS for a replacement due to the leak:


Good job I had my jubilee clips all accessible; the challenge was getting the 2 litres of fuel out of the thing in an orderly way. The top 3 pipes all let out a cup full or so, then I took the HP fuel pump out with the pot so I could save the bulk of the fuel & drain it out in a controlled way.

The steering column had to be detached to give enough room to lift it out:


Unleaded fuel stinks :)

Sunday, 3 February 2013

Passenger seat & seat belt

Seats up next

I'm not using stock runners; mine have a locking mechanism on both sides & have been fitted to the seats for a while now. Theres not much room to position the seats - I thought I would start with the passenger side.

The seat is set at its rear most position on the runners with the back up against the rear panel should put it in the right place. I marked the holes by slipping some masking tape under the holes then drawing through their position with a pen,

Front pair first drilled to 8mm, then with bolts in the front holes and the seat slid forward on its runners the rear holes marked in the same way. With hindsight a template might have been a better option, and may be the only option on the drivers side due to lack of space. I had to widen my 8mm holes a touch to get the seat in place:

As per GBS instruction sheet, cap head bolt, lock nut under the rail & penny washer. Then under the car another penny washer & nyloc to hold everything securely in place. My wife helped holding the top bolt in place while I lay under the car to tighten them:

Seat belts

I'm using TRS belts, top loops need trim since they are an external part and too tight radius:

Picture of the belt's E mark for good measure - incase I need it at IVA:

Top bolts:

.. bottom bolts - incase IVA man needs to see them, I don't think I need covers on these the area behind the seats is exempt:

The result - smart!

I need to order some more nuts & washers then the drivers side is up next weekend.

Boot cover

Now the wheel arches are in position the boot cover needs finishing;

I decided on 5 poppers along the back and two at each side:


The receiving end riveted onto the back of the car, I marked these first to be a straight line & avoiding the velco parts of the boot cover. With the cover offered in place I traced through, brass rubbing style, the position of the poppers onto masking tape;

Fitting the poppers with a £3 from ebay - I found it works best with a metal/solid bench underneath so ended up using my closed vice jaws to sit the tool on. Each popper has its hole drilled in the cover first then hammered over:

I'm using some tarpaulin eyes for the openings around the seat belt mounts in the top of the cover, they are cut to fit snuggly around the mounting points while sitting flush:

Riveting in the stainless bar across the back seat area was tricky, each rivet has to find its way through the bar, boot cover & into the chassis tube underneath:

Doesn't look bad:

I made a decision early on not to fit the GBS hood, so the cover is sitting direct on the boot area with no room for the hood bars.

Hindsight - I should have put the front most press stud right at the front corner of the cover. It's secure as built, but the front corner lifts when driving - I may adapt it later.

Leaks

LP Fuel pump

First thing was to re-work the LP fuel pump, brass fitting removed, more PTFE, re-assembled and a short engine run to test. This time I think I've got it - everything still bone dry, I just need to get another cotton reel rubber mount and it should be good

Coolant

Fuel is all good - but I had a small leak on the coolant system from the bottom hose on the radiator; meaning there was a puddle waiting for me at the front of the car this morning, nose off, tightened the pipe clamps and again, should be good now.

The nose is staying off for a while so I can see everything on the next engine test.


Saturday, 2 February 2013

Fuel system leaks and trouble

Low Pressure Pump

My low pressure fuel pump was still leaking, and so much the fuel actually destroyed its mounting rubber. Consulted RhoCar - its probably not an issue with the pump but rather the brass hose tail which screws into it needs PTFE to seal the joint.

First go - stopped about 80% of the leak, but not quite perfect - it will have to come off again and have a few more winds of tape:

This is the destroyed mounting rubber for the fuel pump, the petrol was welling on the top of the rubber which miss shaped it and completely detached the top mounting plate; I'll have to find another one from somewhere:

Swirl Pot

While testing the LP pump with engine running I took a look around the whole car & noticed a yellow residue at the bottom plate of the swirl pot... hmmm... where is that coming from?

It looks like the swirl pot has a weep/leak when under pressure from the weld join on the top edge (hi-lighted in the red box).

This will have to come out - whether its repaired or replaced it will need draining and removing. 

Bother ! - didn't really need this extra job.

I'll have a chat with GBS and see what the options are. I think its a manufacturing defect.

Wheel arches

Completing the wheel arches, I bought some more rivnuts in the week and finalised the nearside arch - then as a guide marked the holes I had used onto the offside.

I moved the bolt holes on the offside slightly closer to the outside edge which will help it fit better; There are lots of chassis tubes in the area the arches are attached & it was trickier than expected to miss them all:

Both arches in place - the car is wonky due to the offside still being up on an axle stand; I had some work to do with the fuel system so left the wheel off:

Rather ad-hoc placement of bolts - really just positioned to hold the arch on flush & uneven to avoid the chassis tubes under the side panel:

Addendum - after some thought overnight:
I took the arch off and fitted some edge trim along the inside; my thinking is twofold: it will give me another seal against the side panel & makes the edge level across its width taking into account the tadpole moulding on the other side. When the nearside wheel is next off I'll do the same to that arch.


Sunday, 27 January 2013

Silencer & CAT

I bought the GBS silencer with the CAT built in & now I have my two fixed points to work from; the manifold & the rear wheel arch. Offered the silencer in place and marked where the manifold needs to be cut back:

There was just enough room to do this with the dremel extension:

Then a slot in the silencer so the clamp can squeeze it:

... and the GBS bracket which bolts into the floorpan with 3x M10 bolts/nylocs etc. It turned out I couldn't push the silencer onto the manifold with the bracket in place, so it had to come off again.

Silencer fitted - pipe clip & a smear of exhaust paste at the front...

Spring clip with an offcut of exhaust wrap at the rear....

It doesn't sound much quieter on the video - but it is - theres still some oompf there but its a gentler, rounder sound. The video is grainy because it was dark & low light in the garage when I took this:


I ran the engine long enough to get the heating up to temp, also for the first time had hot water through the cabin heater, I also ran the two new GBS maps for power and emissions; I couldn't immediately work out how to use the Lambda sensor - but had open loop readings coming through so its all set to have a play another day.

Everything worked fine except - my leak returned on the low pressure fuel pump - in the same place - the brass fitting on the outlet side of the pump - it will have to wait until I have daylight to fix.

Nearside rear wheel arch

I want to get the silencer fitted so I can tinker with the engine without shaking & waking the house and neighbourhood - makes sense therefore to install the wheel arches so I know how much room I have to play with:

First offered up - trying to get the front and rear edge on the edge of the panels & high enough to cover the hole for the shock absorber. I've seen builds cut a crescent out for the shock - but I don't see why - the wheel arch doesn't get in the way of the mechanism - it would have to be removed to remove the shock though:

Once happy I marked the potential positions for bolts, trying to miss existing rivets, chassis tubes etc - then drilled the wheel arch, placed it back in position and traced through the location for rivnuts. Then a problem - 
    I'm virtually out of rivnuts :(

Still just enough to get things going - 6 of them in place here, & minor issue with the frontmost one - it happened to be in virtually the same location as the seatbelt mounting bolt on the other side - I'll have to move it a little upwards when I have a few more rivnuts:

It doesn't look too bad - the front half fits perfectly, the top and rear is not so great partly due to the rear panel side not being completely flat & partly because it needs another bolt fitting once I have more rivnuts:

All set to fit the silencer...