Showing posts with label panels. Show all posts

Saturday, 30 May 2015

Tyre wear, wheel arch adjustment

Noted in Scotland, My rear tyres were sometimes wearing against the rear wheel arch; especially when the car was fully laden: driver, passenger & luggage.

I had softened the shocks to 10 clicks which gave the rear end a little more bounce; The red circled area on the tyre is worn - but only the surface detail - it is hitting against the inside edge marked green when the suspension is on full compression.

15 minutes with the dremel, I took the wheel arch return edge back about 5mm on both sides, from 12 o'clock to 3 o'clock position & hardened up the rear shocks to +7 clicks in total. Combined this should mean the tyre just misses the arch - hopefully problem solved & invisible unless you crawl around on the ground and look for it:

Good excuse for a 50 mile test run around Kent; Maidstone, Bewl Water, Bedgebury and the scenic route back...

Tuesday, 8 July 2014

Heater bonnet vents

The final step of the heater move, inlets on the bonnet;

My layout has a central pattern to line up with the heater inlet, and two side patterns which are both for aesthetic reasons and to let more engine bay heat out. They will let rain water in but the amount this car drives in the rain - I'm not concerned about it; any ingress will drain directly through over the gearbox to the road.

The layout is 10mm diameter holes, 10mm apart left/right, 15mm apart fore/aft laid out in powerpoint and printed to scale. Template aligned with the heater inlet underneath. Prior to starting I tested hole spacing on a scrap to ensure it didn't weaken the area too much:

3.2mm pilot hole widened to the 6mm required for my sheet metal punch. I carefully drilled them with the bonnet in place on the car - it was the easiest way to hold everything rigid, just needed some care with length of drill bit and awareness of what was underneath:

The sheet metal punch leaves a completely finished hole, no need for filing and a very slight bevel towards the inside of the bonnet:

31 holes, 2 hours work - result as planned though, pretty happy with that:


I just need an opportunity for a drive to see if the heater can still pull in air from the boundary layer around the car when it is moving.

Thats it - the end of the radio/heater project!

Update - short trip round the block today, there is certainly a draw of air through the heater, without the fan going, just using the cars forward speed. The area I have my inlet vents must still be close enough to the windscreen to be in the high pressure area.

Sunday, 23 March 2014

Bonnet pins

Belt & braces - I have not experienced any issue with the bonnet fastening security; however this simple mod ensures there is no lateral movement in the sides and should remove any chance of the bonnet flexing and pushing the catches open.

I decided to tap the top tube to try and minimise impact on the chassis rail integrity; drilled 4.8mm holes tapped out to M6 & some cut down bolts as pins. Finally bought myself a tap wrench, much easier with the right tool for the job:

M6 60mm stainless bolts cut down to approx 45mm, end chamfered on the grinder then installed finger tight with thread lock to stop them shaking loose:

Marking up the bonnet: first the offside located on its catches to mark up the holes on the nearside then vice versa; The holes in the bonnet rail were opened up to M8 so installing and removing the bonnet is still smooth while still limiting its movement once the catches are closed:
  Nearside has pins behind the catches and one either side of the exhaust opening,
  Offsite has pins behind the catches only.


Saturday, 15 March 2014

Stone Guards

The stone guards were part of the original kit, I just never got around to fitting them; now with around 2k miles on the clock there are a few stone chips on the rear arches so makes sense to finish the job.

I had already trimmed them and shaped them to fit the arch:

I opted for some thin edge trim and rivets about 5cm apart: 

Thursday, 18 July 2013

Bonnet vents

Miles on the clock

My round trip to work is 84 miles, so over the last couple of weeks taking in the Zero now and again plus some spins out with colleagues at lunchtime has helped push the total milage past 1000 miles.

Good testing - need to keep an eye on the limited milage insurance though...

Everything has been fine, even in the summer heat & stop start of the M25; engine seems happy and the cooling system is just about able to hold the temperature when in standing traffic. The one big notice though is the engine heat has nowhere to go except finding holes in the pedal box into the footwells and down through the transmission tunnel to slowly cook the driver.

Vents

I'm fitting some bonnet vents to try and give the hot air an escape route and hopefully make things a little more comfortable when driving. I mocked up some options:


Eventually deciding on the last option: two or three small discrete vents on the trailing edge to also have mesh behind when I find the right product.

The sheet metal punch ordered and arrived from Ebay, it winds up with an allen key & punches through the stainless as if it was paper. First up a test on the bonnet cutout to check/confirm which way produces   a clean cut & that I'll end up with a half decent job. 20mm punched holes joined to make the slots:

Then on to marking up the offside. The slots are 20mm high with 10mm spacing. 
Drilling pattern is 4mm pilot holes, widened to 10mm then followed by the punch itself:


Holes all set:

Joined the dots with the Dremel cutting disc & then tidied & de-burred  with one of the Dremel stone wheels & sanding drum. Looks pretty much as expected, this has just been wiped with WD40 to take off the masking tape glue - it will get a proper clean when back on the car:


Both sides done & bonnet back on - all set pending some grille arriving to sit behind the holes. They're not right at the top so won't directly let the hottest air out but might setup a flow under the bonnet from the radiator and at least start moving air through:


Update - I've been out a couple of times in similar heat - nothing definitive, the holes make a some difference - nothing dramatic - good job they look good! I think the next step will be wrapping the exhaust under the bonnet and/or even a vent in the top of the nose just behind the radiator.

Friday, 7 June 2013

Number Plates

I had the plates made up at a local garage, I also have some on order which are a little more minimalist - i.e. don't have the border or 'in your face' garage name & cut down the front plate size to the legal bare minimum. But these will do for now - the important thing is to get the car on the road.

Front

There is a small plate bracket as part of the kit - now with hindsight & 12 months experience building the car this is the sort of part I could easily make myself. Simple ali bracket which bolts to the underside of the nose.

I also took the opportunity with the nose off to remove the indicator extensions - I've been eyeing up some small motorbike style indicators but resisted buying so far. Currently fixing the plate with adhesive pads:

Rear

The back plate either fixes directly to the rear panel, or when my spare wheel is in place needed a couple of brackets on the spare tube. I had two stainless brackets from the original reversing & fog lamps which were perfect:

My two brackets, drilled & riveted, sitting behind the plate, & a nice small number plate lamp which is stuck in place & temporary wiring routed up to the original lamp which is still on the back panel. The dangling wire is temporarily held taught but in due course I need a better route for it through the spare wheel bracket itself:

The tiny number plate LED lamp is actually E marked from CBSOnline; I'll check it out in the dark to see how much it actually illuminates.

I think thats the last step - fully road legal!

Update - The number plate lamp sends light in all directions, including backwards. I've masked up and painted the back face so it doesn't show white light behind.

Sunday, 14 April 2013

Re-assembly

I'm back in countdown to IVA mode;

Today

Painted the inside of the wheel arches with under-seal to give a little more protection than just GRP - it also looks more solid;

Removed the spare carrier assembly and re-inserted grommets;

Wheels back on with locking wheel nuts;

Re-installed the nose.

Next up

A RHOCar member is going to help out with a sound meter next weekend & hopefully another has some evidence that 2.0 Zetec's with the GBS plenum generate max power around 6,200 rpm - both of which should help me get through the sound issue.

Emissions is still a question - I'm more confident now about changing the mixture on the fly - but if I can sort something out it would be great to check the absolute emissions level before the retest.

I need to make time to contact a local garage for the emissions and brakes check...

Sunday, 17 March 2013

Pedal box cover final fit

Fitting the pedal box cover for the final time, 
The brake reservoir line is secured & trim added to make sure nothing chafes:

Pedal box & scuttle area is now complete, with the removable central panel installed & my home made VIN plate sitting on the offside (The VIN can be mounted anywhere obvious - chassis number must be front offside though):

Sunday, 3 March 2013

Bonnet fit & nose attachment

I bought some neoprene self adhesive tape for around the bonnet; The idea being to take up any slack & foam to metal joint rather than metal to metal:


Nose trim - I'm not sure if this is completely necessary for IVA; i.e. its unlikely the tester can actually get the 65mm spehere on this edge; however for the sake of 10 minutes I installed the trim:

Detail on my nose mounting; my nose seemed to fit best inside the chassis tube 'A' brackets, so rather than install rivnuts I went for large washers etiher side and a nyloc on the inside:

This is the first time all the indicator circuits have been fitted: rear, front + repeaters & let me check the indicator flash speed is correct.

Sunday, 24 February 2013

Cycle wing brackets & final fit

The garage is hovering around 5-6ÂșC today, so should be just warm enough to keep the Sikaflex bond/glue happy.

The stuff I put on yesterday is solid enough to hold the wings so the straps & wheels can come off to give me access. Today is to finish the job with some angle brackets to increase the surface area the bond has to grip.

This is cut up plasterers beading - used for finishing outside corners but perfect for this job - light/galvanised only £1/metre and easy to cut & bend into the right shape. Picked up this idea from a discussion on RHoCAR & specifically a remark made by Shaft:

The brackets end up coated in bond, squeezed through the holes from behind - hopefully the wings will be firmly attached to the car once this cures completely:

I just want to leave everything pretty much alone & still now until this completely goes off. Certainly no playing with the engine today - anyway its more like 1-2ÂșC outside today so I don't really fancy rolling her out into the drive to tinker with the engine.

Saturday, 23 February 2013

Front (Cycle) Wings

The so called Cycle wings!

I had been putting this off for a while now; its just not a great fit between the round wing brackets - which whilst very robust do not sit exactly square against the wheel  & the sport wings I'm using. Theres not much room for adjustment either - the wings have to cover the entire width of the wheel & must cover at least 30Âș from vertical at the front.

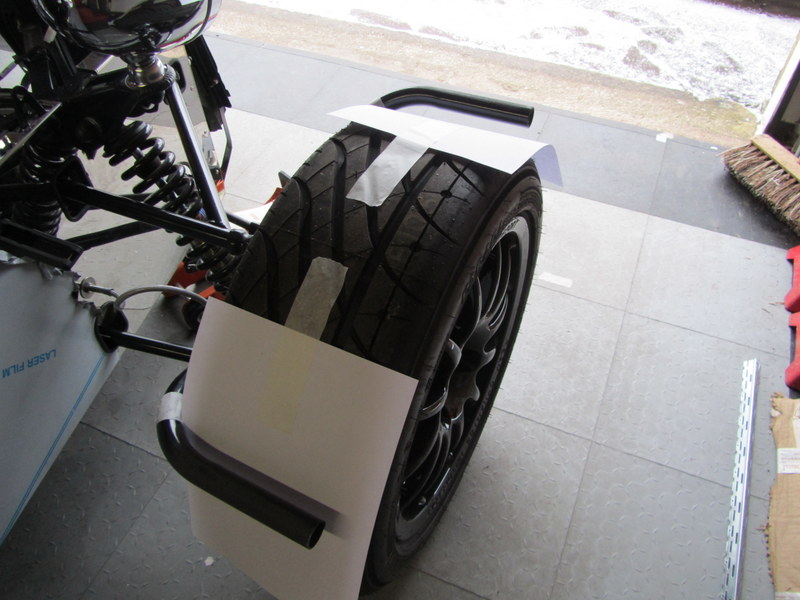
I prepared the bracket tubes with a little coarse sandpaper to give a keyed surface for the bond followed by white spirit on both surfaces to remove any dust; paper in place to avoid anything ending up on the tyre & went for it. 

I'm intending to bond the wings on; but also once this first fix is dry also use some plasterer's corner bead to make up some brackets and re-enforce the joint. The cornering is sitting bottom right on this picture and is perfect for the job - galvanised, holes for bond to push through, cheap & easy to cut in appropriate lengths:

First fix will be enough glue to hold the wings in the right place & let me get the tyres off later to reinforce the joint. The ratchet straps are not that tight - just enough force to hold the wing tight in place while the glue goes off:

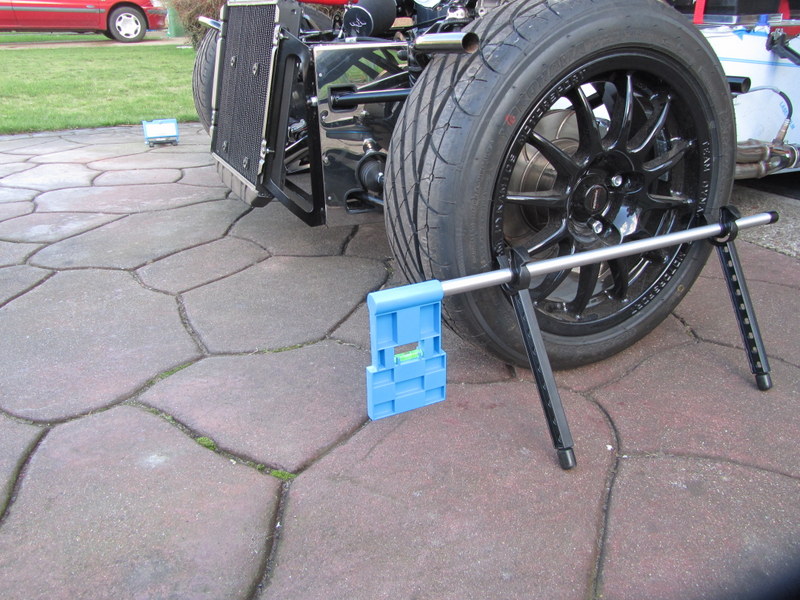
Measuring stick back in use to try and get both sides looking the same (note: the front edge on the sport wings is not horizontal by design):

All up... - it looks cockeyed from this picture - I'm taking the shot from close up (I hope thats the reason anyway :)  :

I'm going to leave it all alone overnight before moving the ratchet straps, taking the wheels off and finish reinforcing the joints.

Hindsight - I should have looked at these from the side of the car and could have lined the arches closer to the tyre profile. 

Sunday, 17 February 2013

Odds & S*ds - Tracking & Wings

Finishing various jobs today;

IVA Looming

I got an email from IVA Gillingham, asking me to get in touch and make an appointment for the test! Yikes - need to get a move on


First up was to turn the car around. My drive is on a slight incline so my thinking was if I have the front of the car just out of the garage it will be level enough to setup the tracking and give me more space either side to 'sight' the cycle wing positions.

This was the first time I manoeuvred the car out of the garage under her own power - so gearbox, clutch & brakes all put through their paces - in a very minor way.

Reversing light working, brake lights working

Slight weep from the now filled brake system - cured with a quarter turn on the pipe union.

Brake push rod

When I got the kit the very first job I did was the brake cylinder & pushrod - I cut the original rod far too short but now I have the brakes filled I created a pushrod of the correct length:


Adjusted the steel 'stop' in the pedal box which is adjusted to prevent the pedal moving too far back. The brake pedal is firm now - a good sign

Pinch Bolt backup

On to the final part of the pinch bolt modifications; I drilled and installed a couple of roll pins (just to the left of the pinch bolt/IVA cover in this picture). These 20mm 3mm diameter roll pins run through the casting and into the dummy upright - even if the bolt were to loosen they might save a catastrophic failure and give a little warning that something was wrong before the upright parted company with the wishbone:

Tracking

My first try at setting up the geometry; just basic front tracking for now. I obtained a TrackACE alignment kit and gave it a try. The principle is a laser bouncing from/to a fixed point and comparing the result between the wheels:

I spent some time finalising and torquing up the steering column and rack. Trying to at least start with the wheel close to centred. With hindsight I guess the car sorts the centering out itself when rolling & I'll need to adjust the steering wheel alignment again later.

Nearside first - everything is aligned so the laser travels twice across the car & hits the zero mark:

Then offside:

The result after my first attempt, I started at 2Âș toe in, and adjusted it back to 15' toe in - 2x complete turns on each track rod. I'm not sure yet the ideal position but its reasonably easy to adjust - by rotating the track rod assembly and winding each side in or out:

All booted up - the nuts will have to be covered for IVA due to the sharp/small radius edges:

Cycle wings

And last up while I had the front of the car outside I offered up the cycle wings. They really dont want to sit in any particular position so I'm going to sleep on it before making anything permanent. I think I'm close; sitting quite far back on the wheel (while also ensuring I have the appropriate 30Âș coverage at the front as required by IVA):

Without the nosecone the car looks very retro - like some 20s or 30s roadster with the big radiator up front.