Showing posts with label brakes. Show all posts

Tuesday, 5 June 2018

Brake fluid change

5 years in, brake fluid has a life of somewhere near 2-3 years depending on how much water it absorbs - so overdue for a change.

This little gadget for ~£5 from Ebay was indicating between 2% and 3% water when dipped in the reservoir. Off the scale when dipped in the extracted fluid.

My Gunson Eezibleed was broken out of storage and used to push out the majority of the old fluid (without introducing air to the brake lines) then push in new fluid behind it. It uses pressure from one tyre rather than the traditional two man synchronised brake pedal/bleed nipple approach.

Bleed through each calipper, starting furthest from the brake cylinder, until the fluid ran clear. Of course one bleed nipple was stuck - offside rear - where I had least working space in the garage but a little WD40 loosened it.

Pictured:  ~0.5 litres of old darker removed fluid (left), vs new clear fluid.

Brake pedal feels hard enough, subject to a test run we should be good for another few years.

Note to self - add double garage with a recess in the floor for a scissor jack to the wish-list.

Sunday, 19 March 2017

Rear shock tweaks & disc vanity

Tweaked the rear coil overs. Half a turn up on the adjuster rings to stiffen / raise the rear end a touch. 

While I had the wheels off a little black paint on the rusty parts of the discs. In the end no need for masking up - the machining on the disc provides contours to paint up to.

Taking care to cleanup the mating surface before re-fitting the wheels. No - that top left bit which looks like it will run, did not!
 

This part on the rears is visible through the wheels, more so on than on the fronts and used to niggle every time I saw it rusty.

Saturday, 1 August 2015

Minor maintenance - suspension & brake adjustment


A little tinkering @ 8.8k miles:
  • Spare wheel swapped to nearside rear to even tread wear;
  • Rear springs adjusted 3/4 of a turn higher since the back has settled a little since build;
  • Front calliper slider bolts removed, copper greased and replaced. I should have paid this more attention on the original build - I had assumed I could just bolt on the recon callipers, but while clean/new etc the sliders did not appear to be greased.

... and, of course, a 'test' run !

Saturday, 5 April 2014

Maintenance

Scotland road trip is coming up, so some basic maintenance to hopefully keep the car happy.

Oil Change ~3.5k miles

I have had a very minor oil drip from the back of the sump since build, while it is not showing up as anything major on regular dip-stick tests, its a good opportunity for an early oil change and just measure how much is left in the engine.

Engine oil change showed I still had 5 litres of oil in the engine - so the drip really is negligible and I'm not worrying about it other than regular level checks.

Diff also checked for levels (as per maintenance schedule), sitting within the required 10mm below the filler, so no problems there.

Brakes Disc/Pad change

My brakes developed a shudder/judder seemingly coming from the front left when braking at high speed. Its not wheel balance and there was nothing obvious visually amiss with the discs or pads, although turning the wheel I could feel a ever so slightly tighter/pinch spot consistent with wider disc, or more pad material laid down at that point.

Best advice seems to point to an issue with a warped disc - which can be caused by any number of things including - stuck guide pins, manufacturing defects in the disc, bad running in on the pads (read driver error).

I have read its possible to correct by hard braking from speed followed by letting the brakes cool with the brakes off; however due to the lack of time until Scotland I decided to swap out the discs and pads

The discs that came out are not obviously warped, by visual inspection and holding up against each other. The pads a little worn asymmetrically - outside pad more than inboard, but again nothing obvious.

On re-assembly, checked the calliper guide pins were clean and very lightly greased them too.

Discs replaced with: Maxtorq vented, drilled & grooved
Pads replaced with:  Mintex 1144
(Spec on Maintenance Page)

I took the car out for a brief test, checking the pedal before moving to remove any slack in the wound back pistons. The above new combination of discs/pads feels excellent - as much bite and stopping power, even on running in/light braking, as the original setup. So happy with the upgrade so far.


Hopefully all set for the Highlands road trip...

Sunday, 24 March 2013

Brakes and Mirrors

Brakes

Invested in a can of brake and clutch cleaner & ensured the brake discs & pads all round were thoroughly de-greased. 

I re flared the front offside pipe, it was originally my first flare and although the fronts were fine on the IVA test I'm much happier with this effort. I was expecting, note the plastic catch tray, lots of leaking fluid - but not nearly as bad as I thought, the viscosity of the fluid in the lines & closed on the other end means very little leaks out during the process:

Once all re-assembled I applied some brake & clutch de-grease fluid all round then bled the entire system, ensuring the rear callipers were fully upside down (meant removing the handbrake lines to do so). I hope this has made a difference.

Hindsight - of course all brake lines should be double flared not single as in this picture.


Mirror vibration

Vibrating wing mirrors mentioned on the test; I re-purposed the large dish washers which are not used on the headlight mounts, adjusting them to fit the inside contour of the scuttle and re-fitted. Its certainly better than it was:

Inside the scuttle showing my makeshift washer:

I understand GBS use custom mounts for the factory cars which mount through the windscreen holes.

Friday, 22 March 2013

Rear brakes: correct braking force

I need to keep the momentum going - so at least moving ahead on the fixes I have a solution for - the noise & emissions will wait...


I made a start on the rear brakes; I failed on rear braking force both from the foot brake and parking brake. I'm going to start with the callipers and work forwards - eventually re-bleeding the whole system.

For today I removed the pads & used a little de-greaser then light sanding to ensure there was no residual storage oil. There was plenty of black brake dust so they must be doing something. I de-greased the disks and re-installed everything.

Next step will be to bleed the system & check the hand brake lines.


I want to re-visit the offside front brake line, its not leaking exactly - It was my first attempt at flaring a pipe and while its 'ok' now I have a little time I'm going to do it again. The downside will be removing the nose for access & then draining and re-filling the brake lines which I wasn't in the mood for today.

Note - didn't need to drain the lines, very little fluid leaks out with just one connection removed.

Tuesday, 19 March 2013

Brake calliper trim

On the quest to remove sharp edges; The front brake callipers have a couple of sharp corners where the brake line screws in & the nut on the line itself is contactable with a 100mm sphere (IVA Exterior projections section 16) and fall outside the wishbone exempt area (same section).

I recall reading on a forum someone getting picked up on this too.

I decided the easiest way to handle these was light dremel to round off the corners of the calliper casting & some rubber tape secured around the nuts.

Before:
After:

(Ditto on the offside)

The inboard end is fine (I think) since the nut is against the side of the car a 100mm sphere would not contact it - I'll take some more rubber tape to the inspection just in case!

Sunday, 17 March 2013

Brake line guard

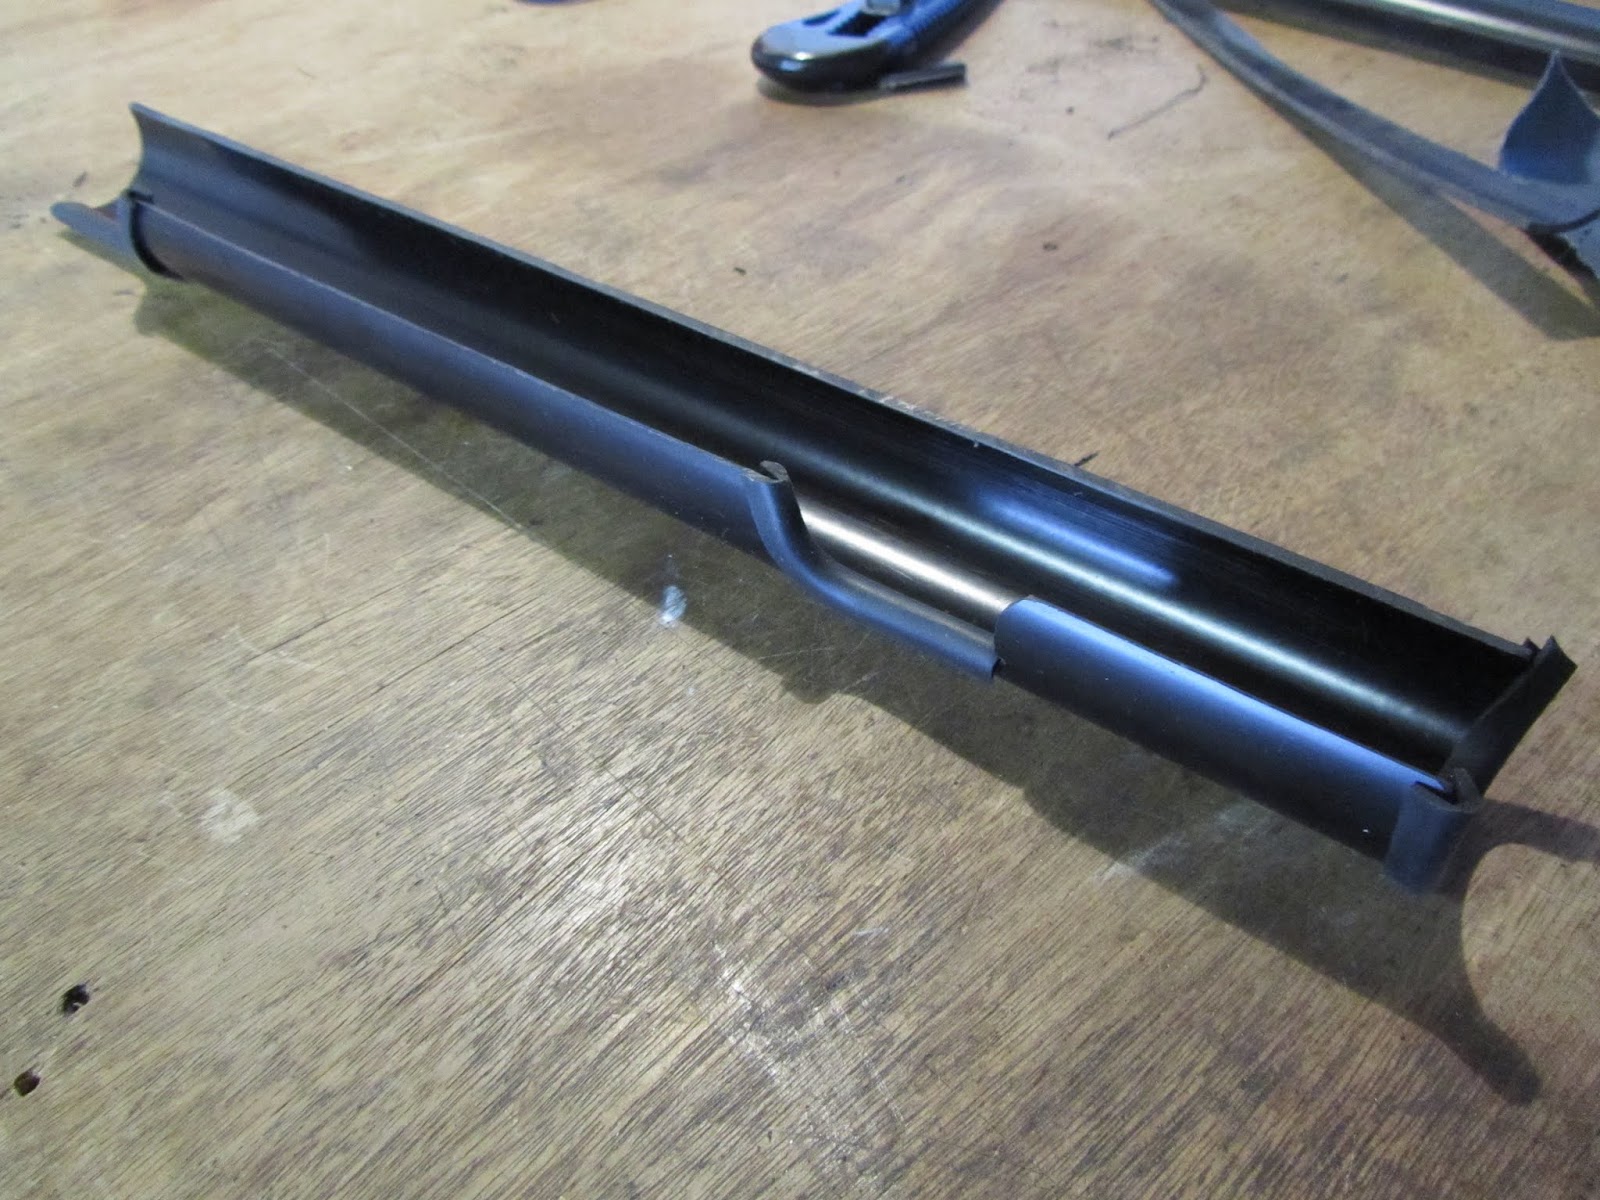
I've read somewhere, don't remember where, that some testing centres like the brake lines covered when they are routed along the underside of the chassis tube. I have no idea whether Gillingham will check this but it makes sense to give the lines some protection anyway:

I'm using a length of PVC pipe adjusted to fit around the lines with strategic trim to ensure nothing chafes:

This picture is unfortunately very dark, but the guard fits neatly against the chassis tube & steering column mount - discrete & neat - there is no way to snag the brake lines now:

Tuesday, 12 March 2013

Brake fluid reservoir

Its far too cold to be messing about in the garage, so just spent 5 minutes this evening connecting up the Brake Fluid reservoir sensor.

Three connectors - ground, normally open, normally closed - the GBS loom connects on the normally open circuit (either side terminals) and pushing the cap centre tests the circuit; lighting the dash warning light.


Ran the engine for a couple of minutes - it ran ok after a couple of minutes but certainly doesn't like tick-over when very cold.

Sunday, 3 March 2013

Front callipers

While the front wheels were off I removed and re-fitted the front calliper mounting bolts. I had originally put both split lock washers & standard washers; I reverted to split washers only.

Before - loosened for this shot showing the split washer and standard washer:

After - split washer only and thread lock:

Sunday, 17 February 2013

Odds & S*ds - Tracking & Wings

Finishing various jobs today;

IVA Looming

I got an email from IVA Gillingham, asking me to get in touch and make an appointment for the test! Yikes - need to get a move on


First up was to turn the car around. My drive is on a slight incline so my thinking was if I have the front of the car just out of the garage it will be level enough to setup the tracking and give me more space either side to 'sight' the cycle wing positions.

This was the first time I manoeuvred the car out of the garage under her own power - so gearbox, clutch & brakes all put through their paces - in a very minor way.

Reversing light working, brake lights working

Slight weep from the now filled brake system - cured with a quarter turn on the pipe union.

Brake push rod

When I got the kit the very first job I did was the brake cylinder & pushrod - I cut the original rod far too short but now I have the brakes filled I created a pushrod of the correct length:


Adjusted the steel 'stop' in the pedal box which is adjusted to prevent the pedal moving too far back. The brake pedal is firm now - a good sign

Pinch Bolt backup

On to the final part of the pinch bolt modifications; I drilled and installed a couple of roll pins (just to the left of the pinch bolt/IVA cover in this picture). These 20mm 3mm diameter roll pins run through the casting and into the dummy upright - even if the bolt were to loosen they might save a catastrophic failure and give a little warning that something was wrong before the upright parted company with the wishbone:

Tracking

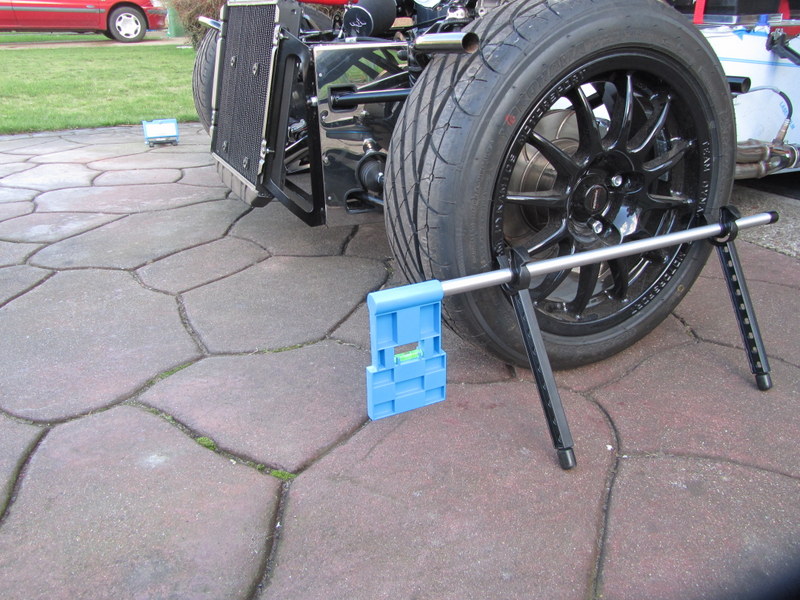
My first try at setting up the geometry; just basic front tracking for now. I obtained a TrackACE alignment kit and gave it a try. The principle is a laser bouncing from/to a fixed point and comparing the result between the wheels:

I spent some time finalising and torquing up the steering column and rack. Trying to at least start with the wheel close to centred. With hindsight I guess the car sorts the centering out itself when rolling & I'll need to adjust the steering wheel alignment again later.

Nearside first - everything is aligned so the laser travels twice across the car & hits the zero mark:

Then offside:

The result after my first attempt, I started at 2Âș toe in, and adjusted it back to 15' toe in - 2x complete turns on each track rod. I'm not sure yet the ideal position but its reasonably easy to adjust - by rotating the track rod assembly and winding each side in or out:

All booted up - the nuts will have to be covered for IVA due to the sharp/small radius edges:

Cycle wings

And last up while I had the front of the car outside I offered up the cycle wings. They really dont want to sit in any particular position so I'm going to sleep on it before making anything permanent. I think I'm close; sitting quite far back on the wheel (while also ensuring I have the appropriate 30Âș coverage at the front as required by IVA):

Without the nosecone the car looks very retro - like some 20s or 30s roadster with the big radiator up front.

Saturday, 16 February 2013

Brake bleeding

I picked up a Gunson EEZIBLEED kit to help setup the brakes. It uses air pressure from a spare tyre to pressurise the reservoir and push the brake fluid through the pipes.

The reservoir has had some fluid in it for a couple of days and master cylinder take offs tightened to remove any obvious leaks.

On the Zero the rear callipers are installed upside down from their original design to allow correct routing of the hand brake lines. They have to be removed to bleed the brake circuit with the bleed nipple at the highest point to avoid air locks.

This is my jury rig propping the bleed nipple to the top and bracing the brake pads with an off-cut of wood to avoid any chance of the piston pushing out. I prepared both sides in the same way:

The EEZIBLEED bottle is primed with brake fluid as was the reservoir then the black line is connected to a tyre (20psi max) to pressurise the system:

Then its just a process of losening each calliper's bleed nipple until the fluid runs clear without air bubbles. The front's are easier & can be simply bled in situ. Very straightforward process, good piece of kit.

My last job is to re install the rear callipers; My original bolts were around 40mm, cut down from 50mm bolts; I prepared some new ones more like 43mm long, to be installed with lock washers & thread lock:

The acid test will be when I have the calipers back on & try reversing the car under its own power into the drive..

Update - those split washers came off for plain washers - split washers are worse than useless.

Sunday, 13 January 2013

Calliper spring clip

I just got around to fitting the nearside brake calliper spring clip; its just visible through the wheel here - after checking with RHOCar & consensus from various blogs this is the right way to fit them to stop the callipers rattling:

Wednesday, 7 November 2012

Offside front suspension & brake calliper

Ditto nearside except:

1. I found the return springs for the brake callipers - so I need to re-visit the nearside to fit one
2. I tightened the copper brake line, then tried to adust the brake line route a little and snapped the flared head off - clumsy & silly!

I need to seek out a pipe flaring kit to re-finish the end of the brake line.


Tuesday, 30 October 2012

Nearside front suspension & brake calliper

I need to get the car back on its wheels so I can shift everything over to the other side of the garage and fit the offside panels;

The front suspension goes back on & torqued up for (hopefully) the final time, I've installed most of the IVA covers, around the panel openings & especially those on the track rods so I don't have to dismantle everything again. The brake line is twisted to ensure it doesn't touch anything as the steering moves from lock to lock:

Calliper installed, bleed nipple uppermost, bolted with lock washers and threadlock & connected up to the copper brake lines inside the car:


Nearside is all set! Shes back on her wheels & looking much more like a car now:
(I still have to sort out the tracking - that can wait until much later)

Sunday, 30 September 2012

Impossible P clips - brake lines

The brake lines now secured down each side of the engine bay with P clips. The two clips near the front of the car are nearly impossible to drill - even with a shortened drill bit (i.e. one I snapped by accident earlier) & 90 degree attachment, all the chassis tubes converge to leave very little space for working:

While the completed job looks fine, the holes for the frontmost clips didn't end up too pretty & the drill bit did spoil the powder coat as it wandered due to the angle I was drilling at. I used a little black hammerite to make good.

Sunday, 15 July 2012

Secure the brake lines

I had the brake lines in place for a number of weeks, but did not want to secure them until I was sure the master cylinder was staying - i.e. I want each end of the run a fixed point before finalising anything. Now I have the brake reservoir these can be fixed in place.

P clips every 15cm or so.

I added fish tank tubing anywhere the lines run alongside a chassis member or round a corner, and upside down clips since I wanted to anchor to the panels rather than drilling the panels & chassis tubes:


I cant secure any further forward for a couple of reasons:
  1. Theres not enough room for my drill, I need a 90 degree attachment
  2. The exact location of the front ends of the brake lines are dictated by the holes in the side panels, which are not installed yet.

Wednesday, 11 July 2012

Brake Reservoir & Sump

Brake Reservoir

Sierra reservoirs are impossible to find, GBS' source has dried up - in the meantime Megadodo on RHOCAR had a spare (Thank you!) - so cleaned it up (biological washing powder & hot water soak then persuaded my wife I to let me use the dishwasher :) and it will be as good as new. I can finalise installing the master cylinder now and fix the brake lines.


Sump

The Raceline sump kit arrived from GBS (a week ago), I need to get the car on its wheels so I can start the engine tasks.

Sunday, 8 July 2012

Hand brake lines

Final fixing on the rear end, the hand brake lines clip to the rear uprights:
Its a 6mm hole, started with a 3.2mm pilot hole but on the offside the bit was blunt & broke - hence a little touch up black hammerite visible.

Sunday, 1 July 2012

Offside rear suspension complete

Offside rear

Shifted the car to the other side of the garage and completed the offside rear;
Hub nut torqued, disc, calliper & handbrake cable installed.

Rear brake 4-way relocated

With the brake 4-way mounted through the chassis hole its very tight against the handbrake lines - ok, but tight. I decided to drill another hole, use the supplied rivnut, and mount the 4-way slightly higher which leaves a little more space & much tidier arrangement. The rivnut gets very close to the chassis member behind & the top edge is governed by the boot floor height.


Next job is the flexible brake hose & underbody paint

Chassis number problem

Problem - I just noticed the chassis number plate GBS welded on for me has a letter missing - right from the middle making it only 16 letters... some how it will have to come off and get replaced.